Monday, 21 January 2013

Lemon and dill lamb

I love the aniseed tones of dill but it's a herb usually only associated with fish. It does have an affinity with other things - it's used in cures for pickled gherkins for example and also turns up a lot in dishes from Poland, Russia and other east European countries. It also partners really well with lamb and goat meat - not the obvious choice but trust me, it works.

This is a really tasty and easy casserole to sling together - it takes only 5 minutes to prep - but it needs about an hour on the hob. When I buy dill for fish I always seem to have masses left over and that's when I might make this.

What you need: 
150g cubed lamb
1 large shallot, finely diced (or a small onion)
1 large potato, cut into bite-size chunks
250ml vegetable stock
Dill, chopped, about 2 handfuls
1 bay leaf
1 lemon, juiced
Flour
Seasoning

What to do: 
Fry the onions in a sauteuse in a little vegetable oil until they soften and turn translucent. While the are cooking, dust the lamb cubes in a little plain flour then add them to the onions. Brown the meat, stirring all the time to stop the flour sticking and burning. Pour over the stock and lemon juice, add the dill and bay leaf and some black pepper. Simmer gently for about half an hour. Add the potatoes and simmer for another half hour or so until they are tender. Add salt to taste then dish up.

Cook's tips: 
The acid in the lemon juice helps to really tenderise the lamb, although tough cuts such as neck will need more than an hour. I usually go for the best lamb available. It should be melt-in-the-mouth tender when ready.

The lemon also produces quite a tart gravy. I like to hold back a little of the dill and stir it into some plain yoghurt for a creamy relish on the side that takes the edge off any sourness.

Sunday, 20 January 2013

Smoked haddock and spring onion risotto

I'm back on the comfort food now the snow has arrived. Great steaming-hot piles of carbs help keep the cold out. My slow cooker has been hauled out of the cupboard to braise lamb shanks and oxtails to be accompanied by heaps of mash, a baked potato or chunks of crusty bread to mop up the gravy.

I also want rice and in this weather that means risotto. And I want fish too - the smoked haddock here produces a sunny yellow that lifts the spirits as the snowflakes drift past my windows.

What you need:
1 fillet smoked haddock
1/2 mug of risotto rice
1 small onion, finely chopped
Vegetable oil
Knob of butter
1/2 litre (1 pint) vegetable stock
2 spring onions, sliced diagonally into 1/2cm pieces
Chopped fresh dill
A little grated Gruyère or Emmenthal

What to do:
Heat the oil and butter in a sauteuse over a medium heat and fry the onion until it's soft and translucent. Add the rice and stir it through so every grain gets coated in the fat. Pour in a little stock and stir well, turning up the heat so it stays on a simmer.

Simmer the fish in a little water until it's just cooked, around 4-5 minutes. Lift it out, break it into large flakes with a fork and set it aside. Add the water to the rice, then keep ladling the stock into the rice and stirring until almost all the liquid has been absorbed and the rice is just turning from al dente. Add the smoked haddock and spring onion and grind in a little black pepper. As soon as the stock is absorbed stir in the cheese and dill and dish up.

Cook's tips:
I've discussed the difference between dyed and undyed smoked haddock before. You won't get the lovely bright yellow colour if you use undyed fish - the colour leaches into the cooking water and the rice takes on the yellow when you add the water to it. Tastewise there is no difference.

I don't bother to add salt as smoked haddock can be salty and there will also be salt in the stock. But, as always, check the seasoning before you dish up and add it if you need it.

Don't use parmesan, the traditional risotto cheese, for this, as the fish will overpower its flavour. I like the Swiss cheese as it adds a nice stringy texture as it melts and it's just strong enough to balance the fish. A medium strong cheddar also works well.

Thursday, 10 January 2013

Roasted sea bream with chermoula on couscous

I acquired a taste for north African food when living in Paris. The city has a huge population of first, second and third-generation Moroccans and Tunisians thanks to France's colonial past and their food is as ubiquitous as curry is in the UK. Parisian Boy and I used to go out for couscous every week - a glorious mix of grilled spicy meats, vegetable broth laced with harissa and the couscous itself.

The Moroccans also invented chermoula, a fiery, sour paste used to marinate chicken and lamb, add to a tagine or to stuff into fish. The ingredients are fairly standard but you can tinker with the quantities to suit your palate.

What you need: 
1 sea bream
Olive oil
4 cloves of garlic
1 red chilli, finely chopped
2tsp each of ground cumin and ground coriander
1tsp each of chilli powder and paprika
Juice and zest of 1 lemon
Couscous

1 heaped tsp of sultanas
5-6 pitted black olives, sliced
1 tsp flaked almonds
1 dessertspoon of fresh chopped coriander

What to do:
Make the chermoula. Crush the garlic cloves with a pinch of sea salt in a pestle and mortar until they form a fine paste. Add the chopped chilli and pound a little more to break it down and blend it with the garlic. Add the rest of the spices, the lemon juice and zest and about 4 dessertspoons of olive oil. Mix well.

Marinate the fish: Stuff the cavity of the sea bream with the chermoula and leave it for at least 20 minutes, longer if possible.

Heat the oven to 200C and roast the fish for around 20-25 minutes. While it's cooking make a portion of couscous (about 100g if you need to measure it) - put it in a heatproof bowl with the sultanas and cover it with boiling water to about 1cm above it. Cover the bowl with a plate and set it aside to soak up the water. Fork it through after 10 minutes to break up any lumps and if it looks too dry, add a little more water from the kettle. When it's ready, stir through the olives, flaked almonds and chopped coriander.

Make a bed of couscous on the plate and put the roasted fish on top.

Cook's tips: 
Get the fishmonger to prepare the fish how you prefer it. In Morocco, you'll get the whole fish on the plate - head, tail, bones - but I always ask mine to take the head off and fillet it while leaving it whole. If you use two separate fillets just sandwich them with the chermoula. Whichever way it's prepared make sure the skin is on as it protects the flesh during cooking. If you can't find sea bream, another small meaty fish such as red snapper or tilapia is equally good.

I like my chermoula really hot and garlicky although I usually discard the seeds when I'm chopping up the chilli - leave them in if you like more heat. For less heat, leave out the fresh chilli and just use the powdered. The finished chermoula should have the consistency of a thick paste so you may want to add the oil a spoonful at a time as you mix it, as you may need less than you think. If it's too thick, add a little more lemon juice. The quantities here make about 2-3 times what you need for the fish - it will keep in the fridge for 2-3 weeks.

Last year I bought Yotam Ottolenghi's brilliant book Jerusalem and discovered that he uses a couple of preserved lemons in his chermoula instead of fresh. I've started doing the same as I love the extra tartness. The preserved lemons need to be very finely chopped and the pips removed.

Wednesday, 2 January 2013

Baked ham

I started baking my own hams last year, fed up with searching for proper ham slices in preference to supermarket plastic ones (which are basically reconstituted and shaped scraps) and paying a premium for the privilege. I'd always shied away from it, thinking it would be really difficult but it's surprisingly easy - the only thing you need is time, so a weekend afternoon is ideal for this sort of pottering in the kitchen.

The best thing about a homemade ham is that you not only get to eat some of it hot for supper, but after it's cooled you've got lovely meat for sandwiches or for adding to dishes that call for ham as an ingredient (such as pea and ham soup or a pie).  
What you need: 
A piece of uncooked gammon, rind on, about 750g
1 onion
Cloves
Bay leaf
Poaching liquid, about 2 litres

For the glaze:
Dark sugar
Grain mustard
English mustard powder
Marmalade

What to do: 
Put the gammon in a pan and cover with the poaching liquid. Add a bay leaf and a whole onion studded with cloves. Bring to the boil, then pop a lid on the pan, turn the heat down and let it simmer for about 90 minutes. Top up the liquid if you need to, to keep the meat covered.

While it's cooking make a glaze for the top. In a bowl mix together a heaped teaspoon of mustard powder and a dessert spoonful each of grain mustard, sugar and marmalade. It should make a thick paste.

Lift the meat out of the pan with a couple of forks and put it in a roasting tin. Using a sharp knife, carefully slice off the rind leaving as much of the fat on as possible. Spread the glaze over the fat and bake for 30-40 minutes at 200C.

Hot from the oven with braised kale and grilled tomato
Cook's tips:
When choosing a piece of gammon, make sure it has a decent amount of fat under the rind as it helps to keep the ham moist while cooking and it adds flavour. You can cut it off on the plate if you don't want to eat it. I usually buy unsmoked but that's just my preference as I like to inject my own flavourings.

For poaching you can just use plain water - it will produce fantastic stock, particularly if you plan to make a soup afterwards. However, as gammon is salted using some other type of liquid will help balance the flavours. Nigella Lawson has a famous recipe for cooking it in coca cola to add sweetness. Cider and apple juice are popular choices and I've done a couple in a fiery ginger beer to bring a little heat to the meat (and adding a little ground ginger to the glaze).

I've added star anise to the poaching liquid, also sprigs of thyme and even a cinnamon stick (not all at once). I like the toffee flavours dark muscovado sugar brings to the glaze, but I also use a dark demarara sometimes. I've also experimented with marmalades, trying both lime and ginger as well as traditional orange.

A piece of gammon weighing around 750g will give you a hot meal and enough cold for another 4-5 portions depending how you use it. Cover it lightly with foil as it cools to stop it drying out, then store it in the fridge covered in cling film. 

Thursday, 20 December 2012

Instant banana ice cream

This cheat's ice cream is the best way I know to use up overripe bananas. It's not quite instant but it involves very little work, has only one ingredient and tastes amazing.

Ice cream is one of those things I always have in the freezer as I don't make puddings unless I have guests or some fruit to use up. It has to be premium ice cream for me and a small bowlful is plenty to satisfy any cravings I have for fat and sugar. Bananas have both without the need to add any extras and the simplicity of this does away with hours of making a custard base, churning and rechurning.You don't need an ice cream machine either, just a food processor.

I've been making this for so long that I have no idea where I originally discovered this. A friend who knows about such things explained the science to me - namely, that when bananas are frozen the fat they contain undergoes some kind of transformation and blitzing it produces the same creamy texture you get in proper ice cream. Whatever - it works!

What you need: 
4-6 very ripe bananas

What to do:
Peel the bananas and slice into 1cm rounds, discarding any blackened or badly bruised flesh. Spread the slices on a baking sheet and pop in the freezer for about an hour - they should be three-quarters frozen, not solid.

Put the three-quarters frozen banana slices into a food processor and blitz them until smooth. Put into a suitable container and refreeze. This makes about a pint / 1/2 litre depending on the size of the bananas.

Cook's tips: 
It's really important that you don't over-freeze the banana - blitzing it fully frozen could burn out the motor  in your food processor. If the slices have frozen solid, leave them to soften a bit before processing.

This freezes rock hard once blitzed and refrozen so take it out of the freezer for 10-15 minutes to soften slightly before scooping a portion.

Extras -  you can, of course, add extra ingredients once you've pulped the banana flesh. Things I've tried that work well include chocolate chips, dessicated coconut, chopped nuts (pistachios, brazils and walnuts are especially good), candied peel. and chopped glacé cherries. For an even creamier texture you could stir through some double cream or Greek yoghurt after processing. Beware of using crème fraiche as it can split when it thaws.

As far as I know this will keep indefinitely, although it's never lasted long enough for me to find out!

Thursday, 13 December 2012

Book review: Quick and Easy Indian Cookbook

It's very rare for me to cook curry at home, as I've said before. So when I was asked to try out the Quick and Easy Indian Cookbook by the Three Sisters, I took as a good opportunity to increase my somewhat basic knowledge.

Despite the title, prepping the various spice mixes was time-consuming. The ginger and garlic paste used in many recipes took me half an hour to make, most of that peeling the garlic cloves. However, it made a generous quantity that can be kept in the fridge or frozen in ice trays and it's the kind of thing I would use for non-Indian dishes too, so I didn't mind. Likewise, toasting and grinding spices before the cooking could begin - I spent 30 minutes preparing the chaat masala spice mix (which is used in many of the book's other dishes). The recipes themselves were mostly fairly straightforward once everything was prepped, although a major challenge for me was working out how to cut down recipes intended for 4 or 6 people into 1 or 2 portions.

I was wary of the chopped green chilli in the Cumin Chicken as I don't like fierce heat, but I needn't have worried. The finished dish was warm and fragrant rather than searing although mine looked rather wetter than the book's photo of it. I made a little tomato and cucumber raita to go with it (not in the book).

The book gives a recipe for making paneer but my kitchen doesn't have the space for setting cheese curds aside to drain so I bought some from an Asian supermarket and cooked two recipes. The shahi paneer, or royal Indian cheese, was a fragrant tomatoey casserole that turned the paneer into very soft curds. The shallow-fried paneer chaat really was quick and easy. I will definitely make both these again.


The gosht boti (lamb chops with tomato) were a disappointment, tasting very bland despite the large number of spices. The instructions were also a baffling mess - during the browning of the meat it says to boil off the water, except the water gets added much later.
The Goan fish curry, which I made with king prawns, really hit the mark. Packed with ginger, garlic and chilli and softened with the coconut milk, it soothed the cold I was suffering from. Despite the long list of ingredients, it was simple to assemble and tasted amazing. And it was easy enough that I'd feel confident cooking it without the book on front of me.

All in all, it's definitely a book I'd cook from again especially if I had guests. A big downside is that too many recipes need you to toast whole spices then grind them as part of the cooking rather than something you can do ahead in quantity - that belies the claim of quickness. I've still got a few bookmarked recipes to try and of the five above, I'd make all of them again except the lamb chops. 

Monday, 10 December 2012

Dauphinoise potatoes

This is one of my favourite ways to eat potatoes - it's rich, silky, unctuous and garlicky. It takes only 5 minutes to prepare and then you can just forget about it until it's ready. I rarely cook it for myself but it's one of those dishes that's fab when you have guests as it never fails to impress. But I'm currently thinking ahead about a solo Christmas dinner. I've not yet decided what meat to roast (I may just grill a very large steak) but if you're using the oven anyway, then it's worth making a single portion.

Dauphinoise is a bit of a heart attack on a plate if you follow the traditional recipe, so I go for a low-fat version which is just as tasty and creamy but slashes the calorie content. I also like lots of garlic in it.

What you need: 
1 large potato
2 cloves of garlic
300ml tub of low-fat crème fraiche
Butter
Salt, pepper

What to do: 
Grease a one-portion pie dish with a small amount of butter. Slice the potato very thinly - about 1mm thick. Peel and slice the garlic cloves thinly. Make a layer of potato in the bottom of the dish, season, scatter over half the garlic and spread over half the crème fraiche. Repeat then finish with a final layer of potato. Dot the top with a little butter. Bake at 180C for about an hour.

Cook's tips:
If you want to follow the traditional recipe, just cut one garlic clove in half and rub it round the dish after buttering. Instead of low-fat crème fraiche, use full fat cream. Single is easiest because it pours well, but go for double if you're feeling decadent because it produces the most luxurious version.

A large baking potato is about the right size. I don't bother to peel it myself. The thinner the slices, the quicker they'll cook. Don't test with a knife for "doneness" - use a fork as it's a much better indicator of tenderness. If it's not quite ready after an hour, give it another 15 minutes.

Don't muck around with Dauphinoise too much - it's a simple dish and is best kept simple so resist the temptation to add sliced onions or bacon. At most, a tiny sprinkling of grated gruyère cheese will help to crisp up the top crust and add a little extra depth.

Wednesday, 5 December 2012

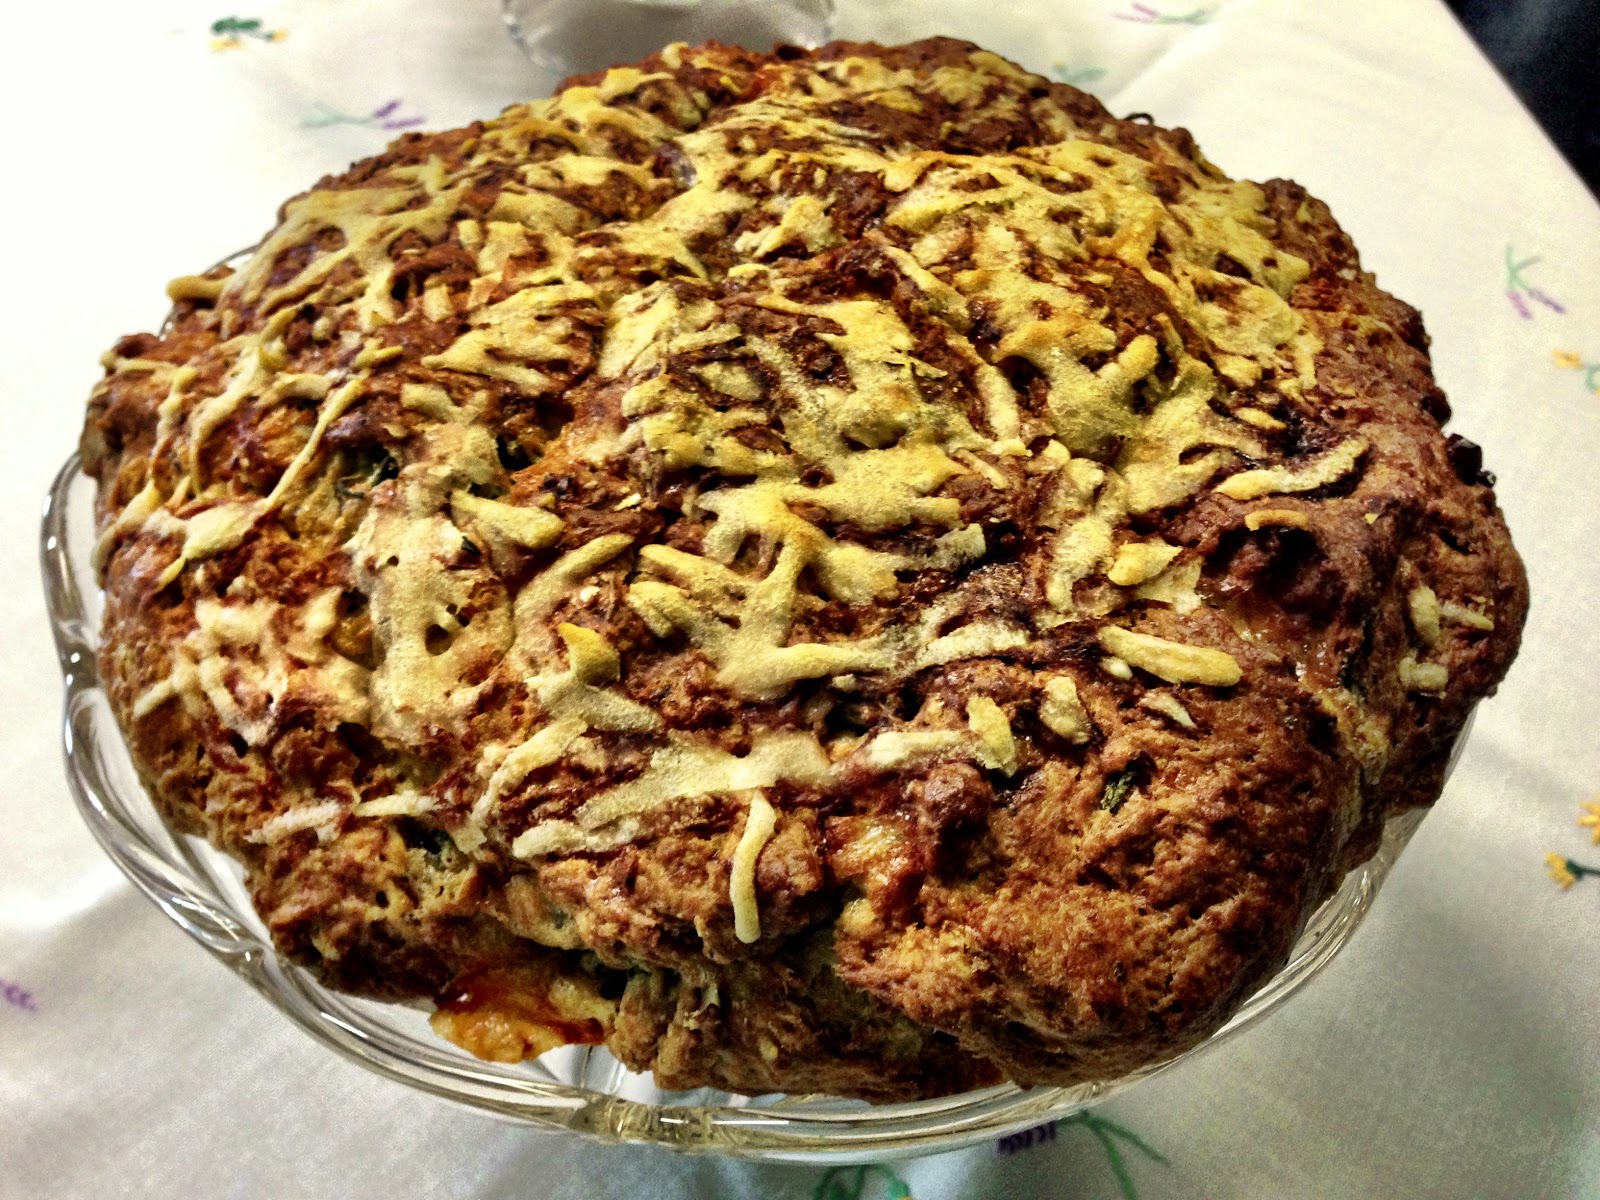
Stilton, rosemary and walnut scone

This almost-cakey slab of savoury carbs is really easy to knock up and the kind of thing I'm likely to bake when I need a supply of snacky stuff to nibble on when I'm working, or as the basis for a lazy supper on a tray in front of the TV.

What you need:
250g self-raising flour
1/2 tsp bicarbonate of soda
45g cold butter, cut into small chunks
150ml milk or soya milk
150g stilton, cut into cubes
A sprig of rosemary, leaves stripped off and very finely chopped
6-8 walnut halves, chopped
Parmesan cheese

What to do:
Heat the oven to 200C.

Sift the flour and baking powder into a large mixing bowl. Rub the butter into the flour with your fingers - it should look like breadcrumbs. Add the milk and work it in gently until it forms dough. If it is too dry to take up all the flour, add a little more milk. If it's too wet sprinkle in a little more flour. Add the cubes of Stilton, walnut pieces and chopped rosemary. Knead the dough so everything is well distributed.

Line a baking sheet with a piece of baking parchment. Put the scone dough on to it, shape it into a round then flatten it very gently. Score the top into eight and grate a little parmesan over it. Bake for 25 minutes or so - it should be risen and golden.

Cook's tips:
Any blue cheese works really well here - try some gorgonzola or bleu d'Auvergne. Blacksticks Blue is especially tasty here but if you're on a budget a Danish blue is just as good.

I like to tinker with the additions - any good melting cheese can replace the blue. I sometimes add some chopped raw bacon or lardons instead of walnuts. A little very finely diced onion adds a good blast of flavour (sprinkle a little on the top too). Chopped fresh thyme or sage can take the place of rosemary. Sliced black olives also work.

I like to make it in a big round as you can break off as much as you want (keep the rest in a tin or wrapped in foil for later) but you could make individual scones with a cookie cutter - adjust the cooking time to 20 minutes then check on them!

The recipe doubles up really easily, just up the cooking time to 30-35 minutes.

Friday, 30 November 2012

Flammekueche

Flammekueche, street food from Alsace, is probably best described as a Franco-German pizza. You won't find any tomato sauce on it, or olives, peppers or any other traditional pizza topping but it's made in the same way - a very thin dough base topped with ingredients then cooked in a very hot wood-burning oven.

The French region of Alsace has historically changed hands with Germany many times, hence the German-sounding name for this dish. The Germans call it flammkuchen, the French tarte flambée, but the Alsatian name is what it's best known by. A while back I discovered that the discount supermarket Lidl sometimes has flammekueche in its freezer section, usually when it has a French promotion, so it's worth having a look there. If I see them, I snap them up quick!

However, it's ridiculously easy to make at home if you cheat. It's absolutely not worth knocking up a batch of pizza dough for one person but if you can get hold of a good quality, ready-made pizza base you can have food on the table in 15 minutes. All you need after that are the toppings - crème fraiche, onions and bacon.

What you need:
An artisan pizza base
Creme fraiche
A small packet of lardons
A small onion, finely diced
Seasoning

What to do:
Heat the oven to 200-220C - if you have time, get it hot well in advance so the heat really has a chance to build up and stay there.

Put the base on a pizza stone and spread it almost to the edge with the creme fraiche - about 3tbsp should be enough for a 12" base. Scatter over the onion and lardons and grind a little black pepper over. Bake in the oven for about 10 minutes.
Cook's tips:
The base needs to be as thin as possible. Anything from a supermarket will be too thick and doughy. The one I used here came from a farmers' market and was handmade. At less than 1mm thick, it was perfect. Check the cooking instructions on the pack but the temperature and time I gave up should be about right. And of course it will depend on the idiosyncrasies of your oven.

If you're using regular bacon, 2-3 slices of streaky cut into 1mm shreds is a good substitute for the lardons.

A classic flammekueche has just the ingredients listed but variations in Alsace include mushrooms or cheese. If you decide to add cheese, don't use cheddar as it goes too gooey - a French-style hard cheese such as Gruyère works best.

Monday, 26 November 2012

Caldo verde

I absolutely love making this Portuguese classic of cabbage, potatoes and spicy sausage - it's a really simple but very nourishing soup that is easy to make and ready in under 30 minutes. This makes 2 portions (it reheats well).

This soup should be quite dense and chunky from the chorizo, kale and potatoes but be held together by a clear broth so it's almost like a casserole.

What you need: 
1 small onion, chopped
1 medium to large potato, diced into 1/2cm cubes
1 chorizo sausage, sliced
A very generous handful of curly kale, chopped
1/2 litre of stock
Olive oil
Salt, pepper

What to do: 
Sauté the onion in the oil over a medium heat until it turns transparent. Add the chorizo and fry until the fat starts to run off. Pour in the stock and add the potato. Season. Turn up the heat, bring it to the boil and then simmer for 15 minutes. Check the potato is cooked. Add the kale and simmer for another 5 minutes. Dish up.
Cook's tips: 
If you can't find kale, use spring greens or savoy cabbage and shred it finely.

If you've got one of those large rings of chorizo, about a third of it should be plenty. You can fry it off separately if it's very fatty and you don't want too much oil in the soup.

I've found that both floury and waxy potatoes work well and I don't bother to peel them unless the skin looks tired. Floury potatoes will start to break down once cooked. Don't overcook them as the liquor should remain clear.

Either vegetable or chicken stock is best. Do go easy on the salt when you season as some brands of stock can be very salty.